

Windows Deployment Services: A Practical Guide to Network-Based Imaging and Unattended Installations
In today’s IT environments, delivering Windows to a multitude of devices quickly and consistently is essential. Windows Deployment Services (WDS) is a powerful Microsoft tool designed to streamline network-based installations, enabling IT teams to deploy standardized Windows images across desktops, laptops, and virtual machines with minimal manual intervention.
This guide walks you through the concepts, setup, and best practices for leveraging WDS—from image creation to unattended deployments—so both seasoned IT pros and beginners can implement an efficient deployment workflow.
What is Windows Deployment Services?
Windows Deployment Services is a role installed on Windows Server that lets you install Windows operating systems over the network. Instead of using a local DVD or USB drive, target machines boot from the network (PXE boot) and receive installation files from the WDS server.
This approach is particularly valuable in large organizations where consistency and speed matter.
WDS supports two core image types:
- Install Images – the actual operating system files to install
- Boot Images – the environment used to start a computer and begin the installation
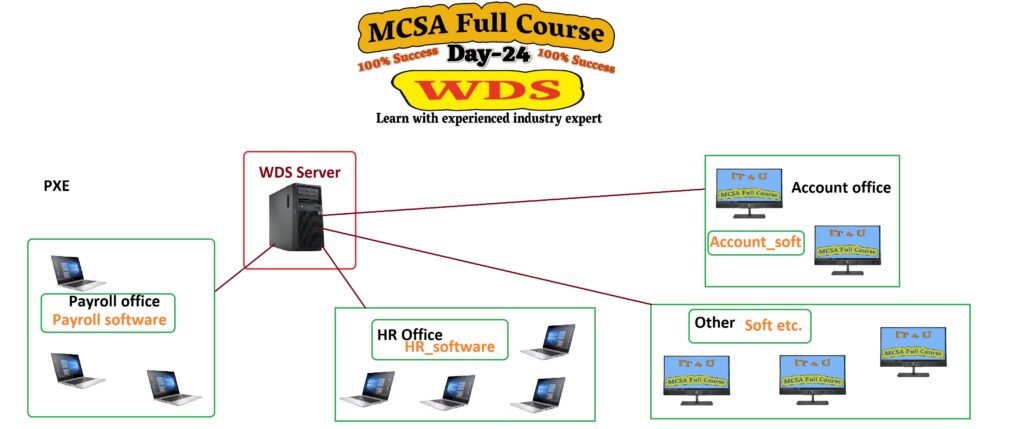
👉 Organizing images into logical groups—often aligned with departments or use cases—lets you tailor deployments to meet specific software needs.
Why use Windows Deployment Services?
- 🚀 Efficiency at scale: Deploy Windows installations across dozens or hundreds of devices without manual setup on each machine.
- 📌 Consistency: Ensure every machine receives the same base image, with uniform configurations and software.
- 🔄 Flexibility: Maintain department-specific images (e.g., Accounts, HR, IT) and boot images to accommodate different hardware.
- ⚡ Unattended installations: Automate repeatable steps (language, locale, user accounts, domain join) to minimize human intervention and speed up provisioning.
Prerequisites and planning
Before configuring WDS, a few network prerequisites should be in place:
- ✅ DHCP and DNS must be active in your environment.
- ✅ Active Directory is optional but simplifies administration.
- ✅ Decide between AD-integrated (centralized management) or Standalone deployment.
- ✅ Plan image management: identify which department images you’ll need (e.g., Windows 11 Pro for IT staff, Windows 11 Education for classrooms) and which hardware models require separate boot images.
💡 Pro Tip: Always check your storage space before setting up WDS. Images consume a lot of disk capacity, so it’s better to keep them on a dedicated drive rather than your system partition.
Getting started: installing and configuring WDS
- Install the Windows Deployment Services role on a Windows Server. In Server Manager, add Roles and Features, then select Windows Deployment Services.
- Configure the WDS server – choose between Integrated with Active Directory or Standalone.
- Set the Remote Installation Folder – by default, WDS creates a
RemoteInstallshare on the system drive, but you can relocate it. - Decide on PXE responses – configure WDS to respond to:
- Known clients only
- Unknown clients (with or without admin approval)
- All clients (not recommended unless secure)
- Start the services – ensure Deployment Server and Transport Server are running (green indicator).
💡 Advanced option: Consider enabling multicast to deploy one image to multiple clients at the same time, which saves bandwidth.
Managing images: Install Images and Boot Images
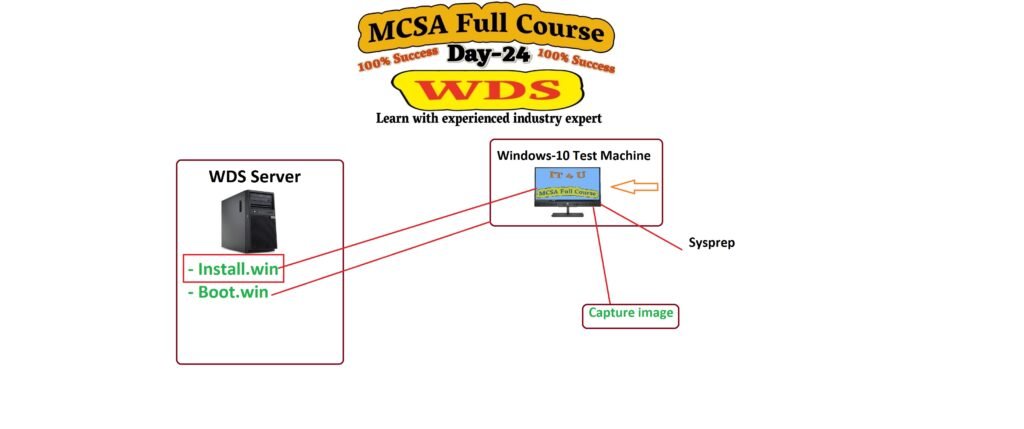
- Install Images: These are the actual Windows operating system images that will be installed on target devices. To create them, you typically mount a Windows ISO (e.g., Windows 11 Pro) and add the relevant Install.image (install.wim) to a new image group. You can create multiple image groups to reflect department needs or licensing variants.
- Boot Images: Boot images enable the network boot process. You’ll add a Boot Image (boot.wim) that the client uses to boot into the installer environment before the OS is installed.
- Image groups: For large organizations, it’s common to organize images into groups (e.g., Windows 11 Pro, Windows 11 Education) to simplify management and deployment. You can customize the names to reflect your internal conventions.
- Editions and customization: An ISO may contain several Windows editions (Pro, Education, Enterprise, etc.). You can select only the editions you need for your environment to streamline deployment and licensing tracking.
💡 Practical tip: Inject network/storage drivers into Boot Images with DISM if you’re working with newer hardware that PXE boot doesn’t support by default.
Deploying to clients: PXE boot and deployment flow
- Client boot flow: When a target machine boots, it requests a network boot via PXE. If the WDS server is configured to respond, the client loads the Boot Image, then proceeds to install using the selected Install Image.
- Unknown vs. known clients: The deployment policy you set determines whether new devices can install, and whether administrator approval is required for unknown devices. Pending devices will appear in a list for manual approval if you’ve enabled that option.
- Admin approval for unknown devices: If you enable this, the admin must approve the new device before Windows installation proceeds. This adds a layer of security to prevent unauthorized devices from provisioning over the network.
- Post-install configuration: After the Windows image is installed, you can perform post-install steps (e.g., naming conventions, domain joining, or applying departmental configurations) using unattended files or post-install scripts.
💡 Reminder: DHCP options (66/67) must be correctly set for PXE boot to work smoothly across all hardware models.
Unattended installations: automating the setup
- The unattended file (answer file) is a core capability to automate Windows installations. It can predefine language, region, keyboard layout, product key/licensing, user accounts, domain joining, and more.
- Generating unattended files: Tools such as Windows System Image Manager (WSIM) from the Windows Assessment and Deployment Kit (ADK) can create unattended XML files tailored to your environment. You can configure numerous settings, including:
- Language, locale, time zone, and currency format
- Product activation and licensing options
- Local or domain accounts, and security questions
- Disk partitioning and drive assignment
- Distribution of unattended files:
- USB boot media: Place the unattended file on the root of a bootable USB drive so that installations on target devices pick up the instructions automatically.
- Network deployment: Store the unattended file on the network or in the WDS deployment share so clients can retrieve it during installation.
- Security considerations: Avoid embedding plaintext passwords in unattended files. Where possible, use domain-join rather than local accounts, and implement secure credential handling practices.
- Practical steps: After generating the unattended file, test it in a controlled environment. Then apply it to your deployment workflow by placing the file on the USB drive or network share and initiating a network-based installation.
⚠️ Security Note: Never keep plaintext passwords in answer files. Always prefer domain-join and secured accounts
Creating a practical deployment workflow
- 🖥 Departmental imaging: Build department-specific images (Install Images) that include the software needed for that department. Use corresponding Boot Images to match hardware and deployment scenarios.
- 📸 Image capture: For ongoing needs, capture a department-specific image from a reference machine and add it to the appropriate image group. This ensures repeatable deployments for future machines.
- 🔄 Automation and testing: Use unattended files to automate routine steps, and test end-to-end deployments with a mix of VM and physical devices.
- 📑 Documentation and governance: Maintain clear records of which image belongs to which department, licensing terms, and hardware coverage. This helps with audits and license compliance.
Best practices and considerations
- Plan carefully: Start with a minimal set of images and expand as needed. Too many images can complicate management and licensing.
- Test thoroughly: Validate images on representative hardware before mass deployment.
- Secure your deployment: Use AD integration when possible, enforce appropriate PXE response policies, and implement controlled approvals for unknown devices.
- Monitor and maintain: Regularly refresh images to include security updates and the latest drivers. Keep a changelog for each image group.
- Documentation: Provide a living document that explains how to update images, how to generate unattended files, and how to troubleshoot common issues.
Conclusion
Windows Deployment Services offers a scalable, efficient pathway to modernize OS deployment across diverse devices and departments. By separating Install Images and Boot Images, organizing images into department-focused groups, and leveraging unattended installations, IT teams can reduce manual labor while delivering consistent, compliant Windows environments.
Ready to streamline your next Windows rollout? What are your thoughts on Windows Deployment Services? Let us know in the comments below!
💬 What are your thoughts on Windows Deployment Services? Share them in the comments below!
📺 Subscribe to our YouTube channel for more tutorials and demos.
📩 Questions? Email us at su*****@**4u.in.
Frequently Asked Questions (FAQ)
1. What is the difference between Boot Image and Install Image in WDS?
A Boot Image is a small environment that loads during PXE boot to start the installation, while an Install Image contains the actual Windows operating system that will be deployed to the client computer.
2. Do I need Active Directory for WDS?
No, Active Directory is not mandatory. You can set up WDS in standalone mode, but integrating it with AD makes it easier to manage and secure deployments in larger networks.
3. Can I use WDS to deploy Windows 11?
Yes, WDS supports Windows 11 as long as you are using a supported version of Windows Server and you have the correct ISO files and drivers.
4. How can I add drivers to WDS?
You can use DISM (Deployment Image Servicing and Management) or third-party tools to inject drivers into your Boot Image or Install Image. This is useful when working with newer hardware that PXE boot does not support by default.
5. Is it possible to automate the entire deployment process with WDS?
Yes. By using unattended answer files, you can automate most installation steps like partitioning, language selection, user accounts, and domain join, making the process fully hands-off.
6. How do I make sure deployments are secure?
- Allow WDS to respond only to known clients, or require admin approval for unknown devices.
- Use Active Directory integration where possible.
- Never store plain text passwords in unattended files.
7. What are the common issues with PXE boot in WDS?
The most common issues are DHCP option misconfiguration (Option 66 and 67 not set correctly), missing drivers in the Boot Image, or firewall rules blocking PXE traffic. Testing across different hardware is always recommended.
Demo ClientUnattend-Win11-X64-PromptPartitions.xml File
Below is a demo file you can use for WDS deployment. Copy it into a text editor and save as ClientUnattend-Win11-X64-PromptPartitions.xml.
📥 Download the demo file
Download ClientUnattend-Win11-X64-PromptPartitions.xml


Add comment