MCSA Full Course Day-3 Virtual Switch Manager
In today’s post of our MCSA full course, we will dive into the crucial aspect of managing virtual switches. A virtual switch is an essential component in the networking architecture of virtualized environments. Whether you’re working with Windows Server or Hyper-V, understanding how to configure and manage virtual switches is key to optimizing network performance and ensuring network security.
Virtual Switch Manager
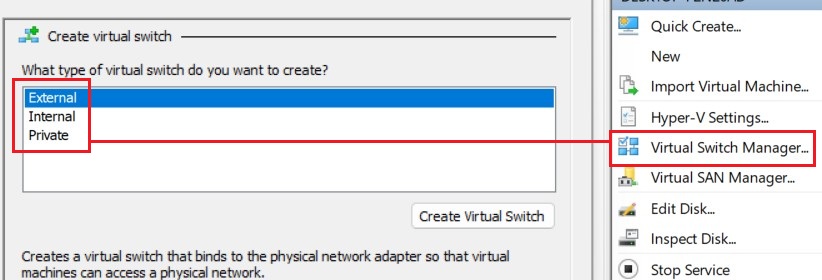
You can see, on the right side, you have the option ‘Virtual Switch Manager.’ If I click on this, you will see three options here: External, Internal, and Private. I will explain each of these in detail, including the differences between them. But before that, we will first look at how connectivity works in our company’s network.
How connectivity works in company’s network
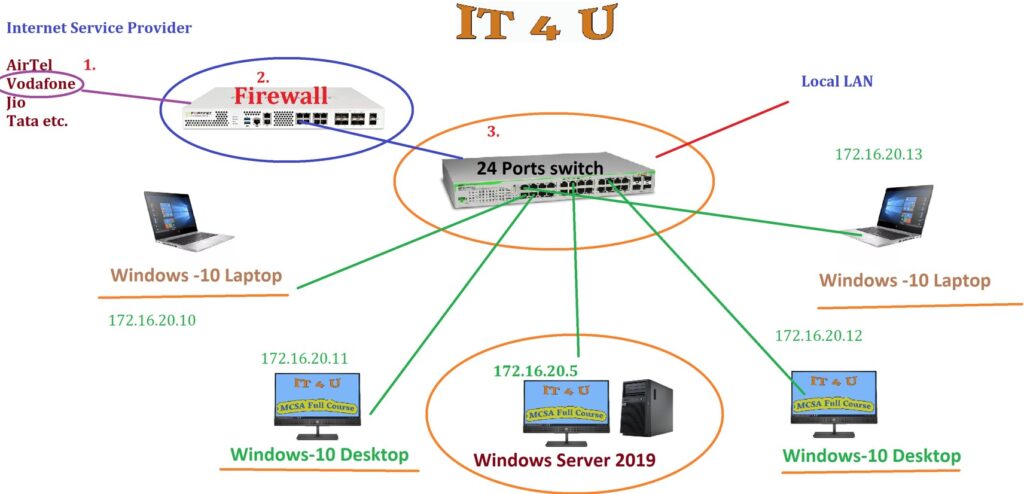
As you can see in the above picture, we have some laptops, desktops, and servers. For example, there are some Windows 10 laptops and Windows Server machines. In the company’s network, if you need to establish connectivity between two devices, you will connect them via a switch using a network wire. Similarly, the other machines will also be connected to the switch
All devices stay connected with each other through a network, and each device has a unique IP address, which gives each device its own identity. For instance, the laptop’s IP address could look like this: 172.16.20.13. Additionally, the IP addresses of other devices are also important for establishing connectivity between them.
If we need to connect to the internet, the network is filtered through a firewall. The firewall secures the company’s network, ensuring that incoming connectivity from the outside world remains safe. After the firewall, the internet connectivity will reach the switch, allowing all devices to access the internet.
The internet service provider, such as Airtel, Vodafone, Jio, or Tata, provides the connectivity. Then, the internet is brought into the network through the firewall, allowing all devices to use the internet.
In this entire network setup, switches may have different types of setups on different floors. If the company has multiple floors, there could be several devices on each floor based on the specific needs. This entirely depends on the IT infrastructure of your company. I hope you now understand how connectivity works in the company’s network.
Now, we return to the Virtual Switch Manager, where there are three types of switches: Private, Internal, and External.
What is Virtual Switch Manager and How It Works?
In today’s digital-first world, virtualization has become an essential part of IT infrastructure, helping organizations maximize resource utilization and scalability. One of the most important components of virtualization is the Virtual Switch Manager, a tool that plays a key role in managing virtual networks. But what exactly is it, and how does it work? Let’s dive into the details.
What is Virtual Switch Manager?
The Virtual Switch Manager is a feature provided by hypervisors like Microsoft Hyper-V, used to create and manage virtual switches in a virtualized environment. A virtual switch acts as a bridge, enabling virtual machines (VMs) to communicate with one another and with external networks, including the internet and physical devices.
Virtual switches work much like traditional physical switches, but instead of connecting physical devices, they connect virtual machines and virtual networks within the host system. The Virtual Switch Manager provides the tools and interface needed to configure these virtual switches for seamless communication, enhanced security, and optimal performance.
Types of Virtual Switches in Virtual Switch Manager:
- Private Virtual Switch
- Internal Virtual Switch
- External Virtual Switch
1. Private Virtual Switch:
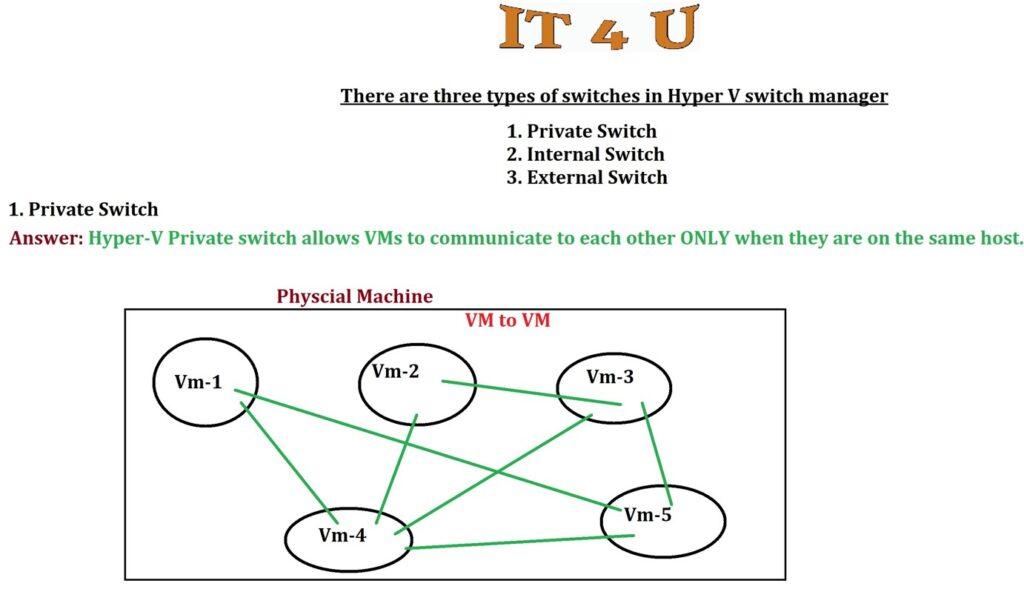
As we saw in the Virtual Switch Manager, we have three types of switches: External, Internal, and Private. Now, let’s understand how each of these works. First, we will talk about the Private Switch.
A private switch can only communicate between machines that are on the same host. This means that if you have a physical machine and have created virtual machines on it, these machines will only be able to communicate with each other. They will not be able to access your local machine or the internet.
Let’s understand this with an example. Suppose you have a physical machine, and you have created five virtual machines on it. If you connect these virtual machines to a private switch, they will only be able to communicate with each other, not with your physical machine.
I hope it is now clear how the private switch works. If you have any questions or doubts, please leave a comment below, and I will respond to you.
2. Internal Virtual Switch
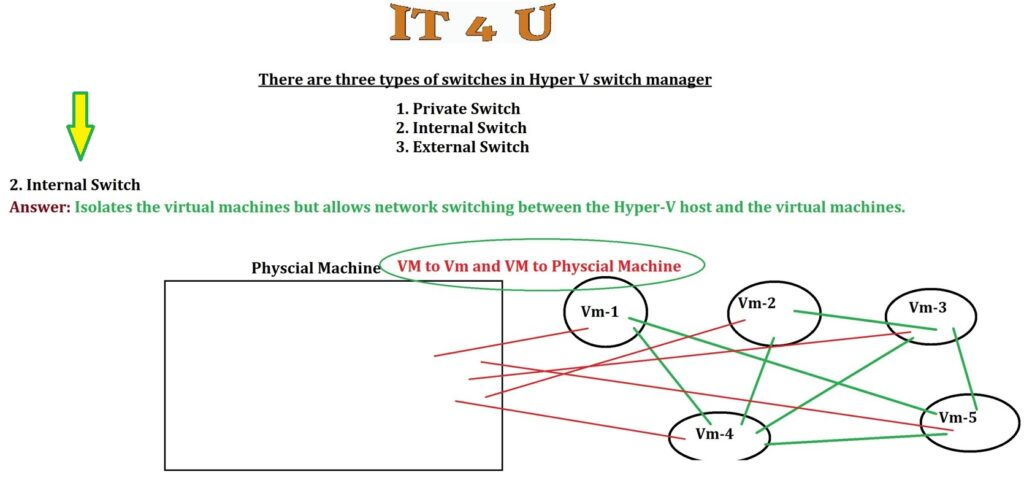
Internal Switch isolates virtual machines but allows network switching between the Hyper-V host and the virtual machines. This means that the virtual machines you have created on your physical machine can also communicate with your local physical machine.
For example, As you can see in the above picture, suppose you have a physical machine, and you have created five different virtual machines on it. As we saw in the private switch, virtual machines could only communicate with each other. However, with an internal switch, your virtual machines can also communicate with the physical machine.
This means that if a virtual machine needs to connect with the physical machine or if the physical machine needs to communicate with a virtual machine, it can be done easily. Using the internal switch, physical and virtual machines can interact seamlessly.
I hope it is now clear how the internal switch works. If you have any questions or doubts, please leave a comment below, and I will respond to you.
3. External Switch
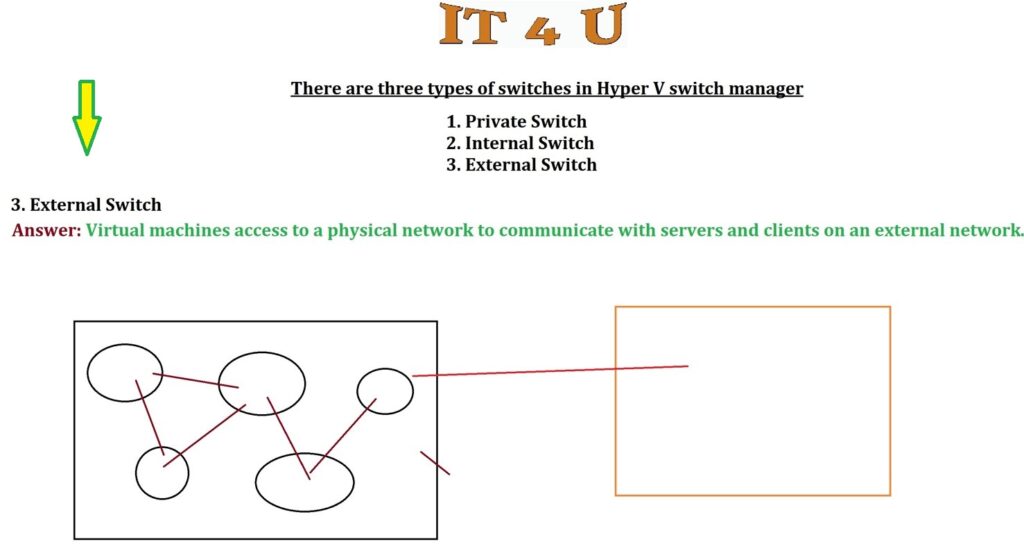
External Switch allows virtual machines to access the physical network and communicate with servers and clients on the external network. In a professional setup, you can connect from virtual machines to physical machines, and then to the internet as well.
For example, let’s say you have virtual machines running on your physical machine. If you connect these machines using an external switch, they will be able to communicate with each other, with the physical machine, and also access the internet. Furthermore, if you want to connect to another network or update another virtual machine, this can also be done using the external switch.
I hope it is now clear how the External Switch works. It not only allows your Hyper-V virtual machines to connect to the physical network and the internet but also provides access to other networks and machines. If you have any questions or doubts, please leave a comment below, and I will respond to you.
Let me explain this in simple terms.
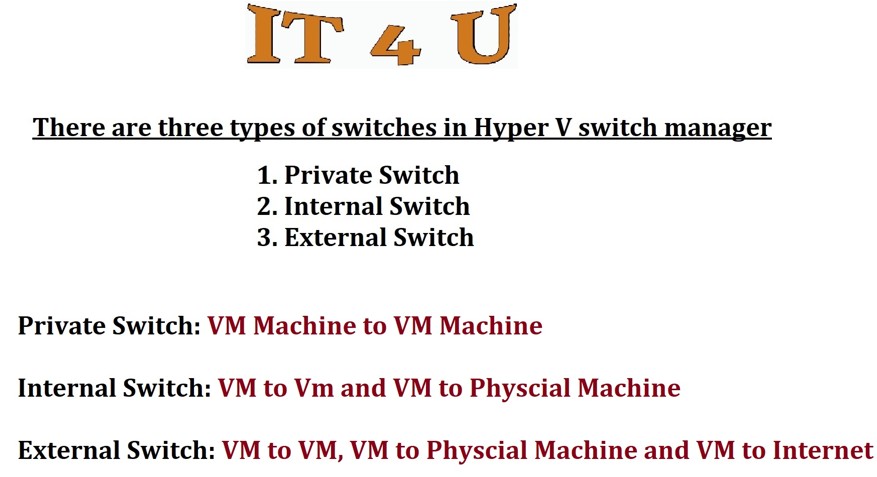
If you connect a Private Switch, it allows only VM-to-VM (Virtual Machine-to-Virtual Machine) communication.
If you create an Internal Switch, it allows both VM-to-VM communication and VM-to-Physical Machine communication.
On the other hand, with an External Switch, you can enable VM-to-VM, VM-to-Physical Machine, and even access the internet or connect to another external network.
I hope it is now clear how the three types of switches in the Virtual Switch Manager works. If you have any questions or doubts, please leave a comment below, and I will respond to you.
Step-by-Step Guide to Create Virtual Switches in Hyper-V
Before creating any virtual switch, make sure you have the necessary administrative permissions to configure Hyper-V on your machine.
Creating a Private Virtual Switch
A Private Virtual Switch isolates the virtual machines from both the host and the external network. This type of switch is ideal for testing environments where communication between VMs is required without any interaction with the host or external network.
1. Creating a Private Virtual Switch
A Private Virtual Switch isolates the virtual machines from both the host and the external network. This type of switch is ideal for testing environments where communication between VMs is required without any interaction with the host or external network.
Steps to create a Private Switch:
- Open Hyper-V Manager: Go to Hyper-V Manager from the Start menu.
- Select Virtual Switch Manager: From the Actions panel, click on Virtual Switch Manager.
- Create New Virtual Switch: Select New Virtual Network Switch and choose Private.
- Configure Switch Settings: No additional settings need to be configured for a private switch. It is inherently isolated and does not allow communication with the host or external networks.
- Click Apply: Once the private switch is configured, click OK to save the changes.
A private virtual switch restricts communication to only the VMs connected to it. This is ideal for secure, isolated testing environments.
2. Creating an Internal Virtual Switch
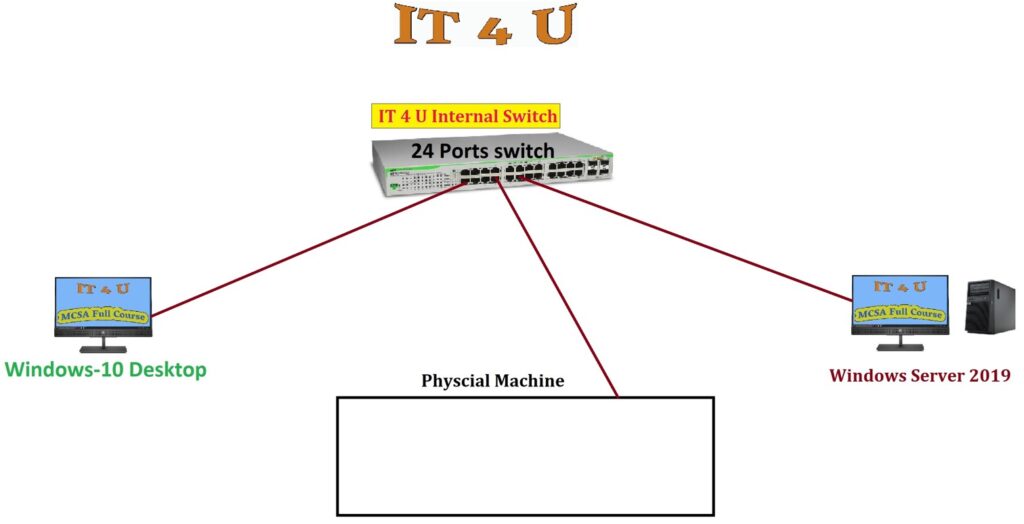
An Internal Virtual Switch allows communication between virtual machines and the host operating system. However, it doesn’t provide access to external networks or devices outside the host.
Steps to create an Internal Switch:
- Open Hyper-V Manager: Search for Hyper-V Manager from the Start menu.
- Select Virtual Switch Manager: Click on Virtual Switch Manager from the Actions panel.
- Create New Virtual Switch: Select New Virtual Network Switch and choose Internal.
- Configure Switch Settings: Select the adapter to be shared with the VMs and the host. The VMs will only be able to access the host system, but not the external network.
- Click Apply: Once configured, click OK to apply the internal switch.
With an internal virtual switch, VMs can communicate with each other and the host, but they won’t have access to the internet or external devices.
3. Creating an External Virtual Switch
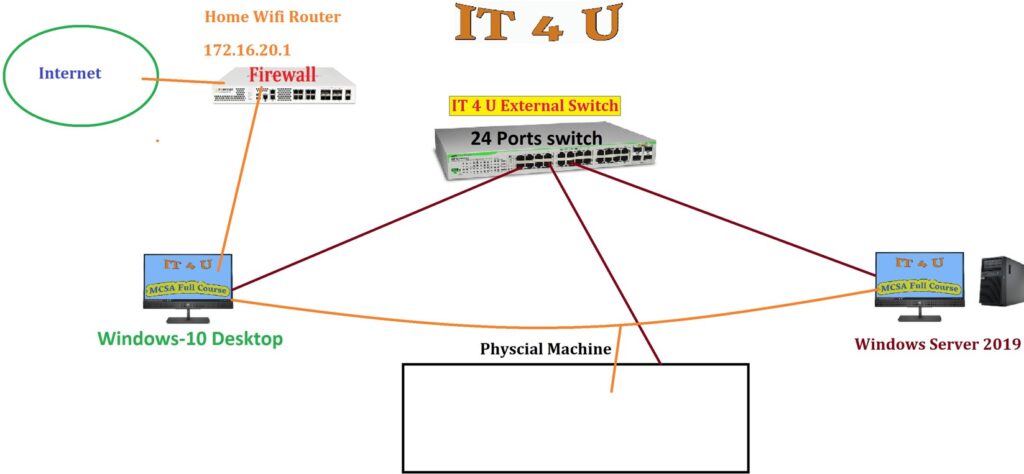
An External Virtual Switch connects your virtual machines to the physical network, allowing them to access the internet, communicate with external devices, or use the host machine’s network adapter.
Steps to create an External Switch:
- Open Hyper-V Manager: Click on the Start Menu and search for Hyper-V Manager.
- Select Virtual Switch Manager: In the Actions panel on the right, click Virtual Switch Manager.
- Create New Virtual Switch: In the Virtual Switch Manager, click New Virtual Network Switch and choose External.
- Configure Switch Settings: Choose the physical network adapter to be used by the virtual switch. This adapter will be shared by the VMs, enabling them to access external networks.
- Select the appropriate network adapter: Make sure to select the network interface card (NIC) that is connected to your external network.
- Click Apply: After configuring the external switch, click OK to apply the changes.
The external virtual switch will now allow VMs to access the internet and external networks through the host machine’s NIC.
For a detailed, step-by-step installation guide, check out my video where I explain each step in detail. If you’re still facing any issues, feel free to leave a comment below, and I’ll be happy to help you resolve them.
Here’s a professional rewrite of your blog post with just the headings and timestamps:
0:00 – Introduction
0:15 – Hyper-V Virtual Switch Manager
0:30 – How to Create Virtual Switches on Hyper-V Manager
0:46 – Real Company Network Environment Setup
05:13 – What is a Private Switch in Hyper-V Switch Manager and How Does It Work?
06:13 – What is an Internal Switch in Hyper-V Switch Manager and How Does It Work?
07:17 – What is an External Switch in Hyper-V Switch Manager and How Does It Work?
08:47 – How to Create a Private Switch in Hyper-V Switch Manager
09:42 – How to Connect a Private Switch with Virtual Machines on Hyper-V
10:52 – How to Check Network Connection Between Two Machines
11:45 – How to Assign an IP Address on Windows 10
13:27 – How to Check Windows 10 IP Address
13:55 – How to Create a Private Switch Lab on Hyper-V
19:06 – How to Create an Internal Switch in Hyper-V Switch Manager
19:26 – How to Create Internal Switch Lab on Hyper-V
19:52 – How to Check the Internal Switch Network Connection Between Two Machines
22:30 – How to Create an External Switch in Hyper-V Switch Manager
23:35 – How to Create External Switch Lab on Hyper-V
If you found this blog post helpful, please leave a comment below, and feel free to share it with others who may benefit. Stay updated with all upcoming tutorials by subscribing to the channel. This post serves as a key step in your journey to mastering MCSA and virtualization. Rest assured, I’ll be providing detailed guides and expert tips to support you every step of the way.
Stay tuned for the next post, where we will dive deeper into Day-4 Checkpoints Hyper V in Hyper-V!