
Print servers are essential for managing multiple printers in a business network. Whether you are an IT professional or a beginner, understanding how to configure and manage a Windows Print Server can save time and improve efficiency. In this guide, we will walk you through everything, from installation to advanced printer management using Group Policy.
What is Print Server Management and Why Do We Need It?
Print Server Management is the process of centralizing the management of network printers. Instead of installing and maintaining printers individually on every computer, a print server allows all printers to be managed from a single point.

Key Benefits:
- Centralized management of all network printers
- Easy deployment to multiple users or departments
- Streamlined printer updates and driver management
- Enhanced security with user/group permissions
For example, a company may have multiple printers: HR, Payroll, Admin, and Accounting. Using a print server, you can deploy the HR printer only to HR staff, Payroll printer only to the payroll department, and so on, all from one central server.
How to Set Up a Print Server in Windows
Follow these steps to create a print server:
Step 1: Install Print and Document Services
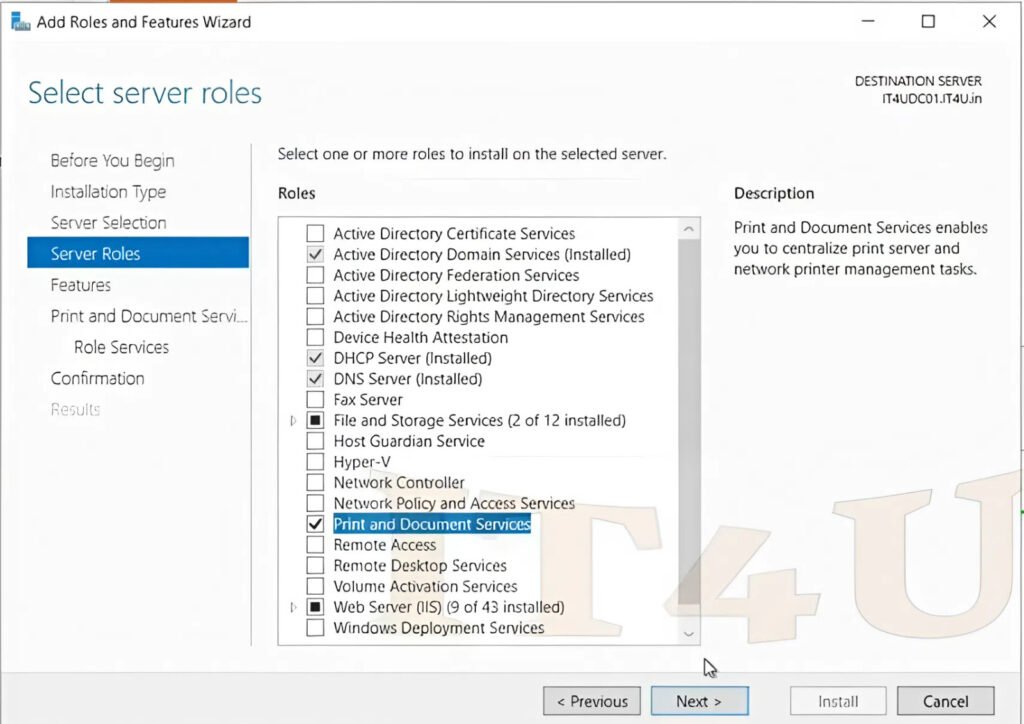
- Go to Server Manager → Add Roles and Features.
- Choose Role-based or feature-based installation.
- Select your server and click Next.
- Select Print and Document Services and proceed.
- Ensure Print Server is checked under Role Services.
- Click Install.
After installation, your server will be ready to manage printers centrally.
Step 2: Configure Static IP for Printers
- Ensure each printer has a static IP to prevent address changes.
- For Wi-Fi printers, reserve IPs through the DHCP server.
This ensures smooth communication between the server and network printers.
Managing Printers on the Server
Once the Print Server role is installed:

- Go to Tools → Print Management.
- Here, you can view all printers, drivers, and properties.
- Manage print jobs, export/import printer settings, and control printer queues.
Adding Printer Drivers
- Right-click → Add Driver.
- Choose architecture (32-bit/64-bit) and point to the driver folder.
- The driver is now available for installation on compatible printers.
Managing Forms and Paper Sizes
- Right-click → Manage Forms.
- Add custom paper sizes or select from existing forms for special print jobs.
Adding Printers to the Server
You can add printers using different methods:
Option 1: Search Network Printers
- Automatically discover printers already available on the network.
Option 2: Add by IP Address or Hostname
- Useful in corporate or government setups where printer IPs are known.
- Enter the printer IP, e.g.,
192.168.1.72, and Windows will detect it automatically.
Option 3: Manual Installation
- Add Bluetooth or wireless printers.
- Specify TCP/IP addresses if automatic detection fails.
Pro Tip: For demo purposes, you can add a test printer if no physical device is available. The steps are identical to real-world setups.
Configuring Printer Properties and Permissions
Once a printer is added:
- Name the Printer – Example: HR Printer.
- Share the Printer – Optional; allows network access.
- Set Location – e.g., “First Floor HR Office.”
- Add Comments – e.g., IP address or notes for users.
Advanced Settings
- Printer Queue – View active jobs, size, and user info.
- Printing Preferences – Adjust color, orientation, and paper size.
- Security & Audit – Assign rights to specific users or groups:
- Example: HR seniors can print/manage; others denied access.
This ensures controlled access and efficient printing management.
User vs Computer Configuration
- User-based deployment – Printer follows the user wherever they log in.
- Computer-based deployment – Printer is installed on specific machines, regardless of user.
This is critical when using Group Policy for printer deployment.
Deploying Printers via Group Policy (GPO)
- Open Group Policy Management in Active Directory.
- Navigate to the relevant OU or user group.
- Create a new GPO, e.g.,
C450 Printer. - In Print Management, right-click the printer → Deploy with Group Policy.
- Select the GPO created.
- Choose deployment type:
- User – Printer available whenever users log in.
- Computer – Printer available on designated machines.
- Click OK to apply.
Verifying Printer Availability
- Go to Control Panel → Devices and Printers on a client machine.
- Printers appear only for authorized users or computers.
Troubleshooting
- If a printer doesn’t appear, run
gpupdate /forceor restart the client machine. - Ensure correct permissions are assigned.
Practical Notes from Real Setup
- Even demo printers can be added the same way as real ones.
- You can manually edit, remove, or redeploy printers.
- Printers can be locked, non-discoverable, or searchable depending on policy.
- Assign different permissions to groups and individual users for precise control.
Conclusion
Windows Print Server Management allows centralized control of multiple printers, driver updates, and user permissions. By following this step-by-step guide, IT professionals and beginners alike can efficiently manage network printing, reduce manual workload, and ensure secure printer access.
Watch the Full Step-by-Step Video Tutorial
For a detailed, step-by-step guide on configuring a Print Server Management.
Follow along in the video to see every configuration step in action — perfect for both IT beginners and professionals.


Add comment